Target Users: Seniors and people with disabilities using powered wheelchairs
Core Value: Enable wheelchair users to cook, clean, and work independently and safely in the kitchen
1. Pre-Renovation Assessment
1.1 User Capability Assessment
Before starting modifications, assess the user's abilities. This affects every decision from counter height to faucet type.
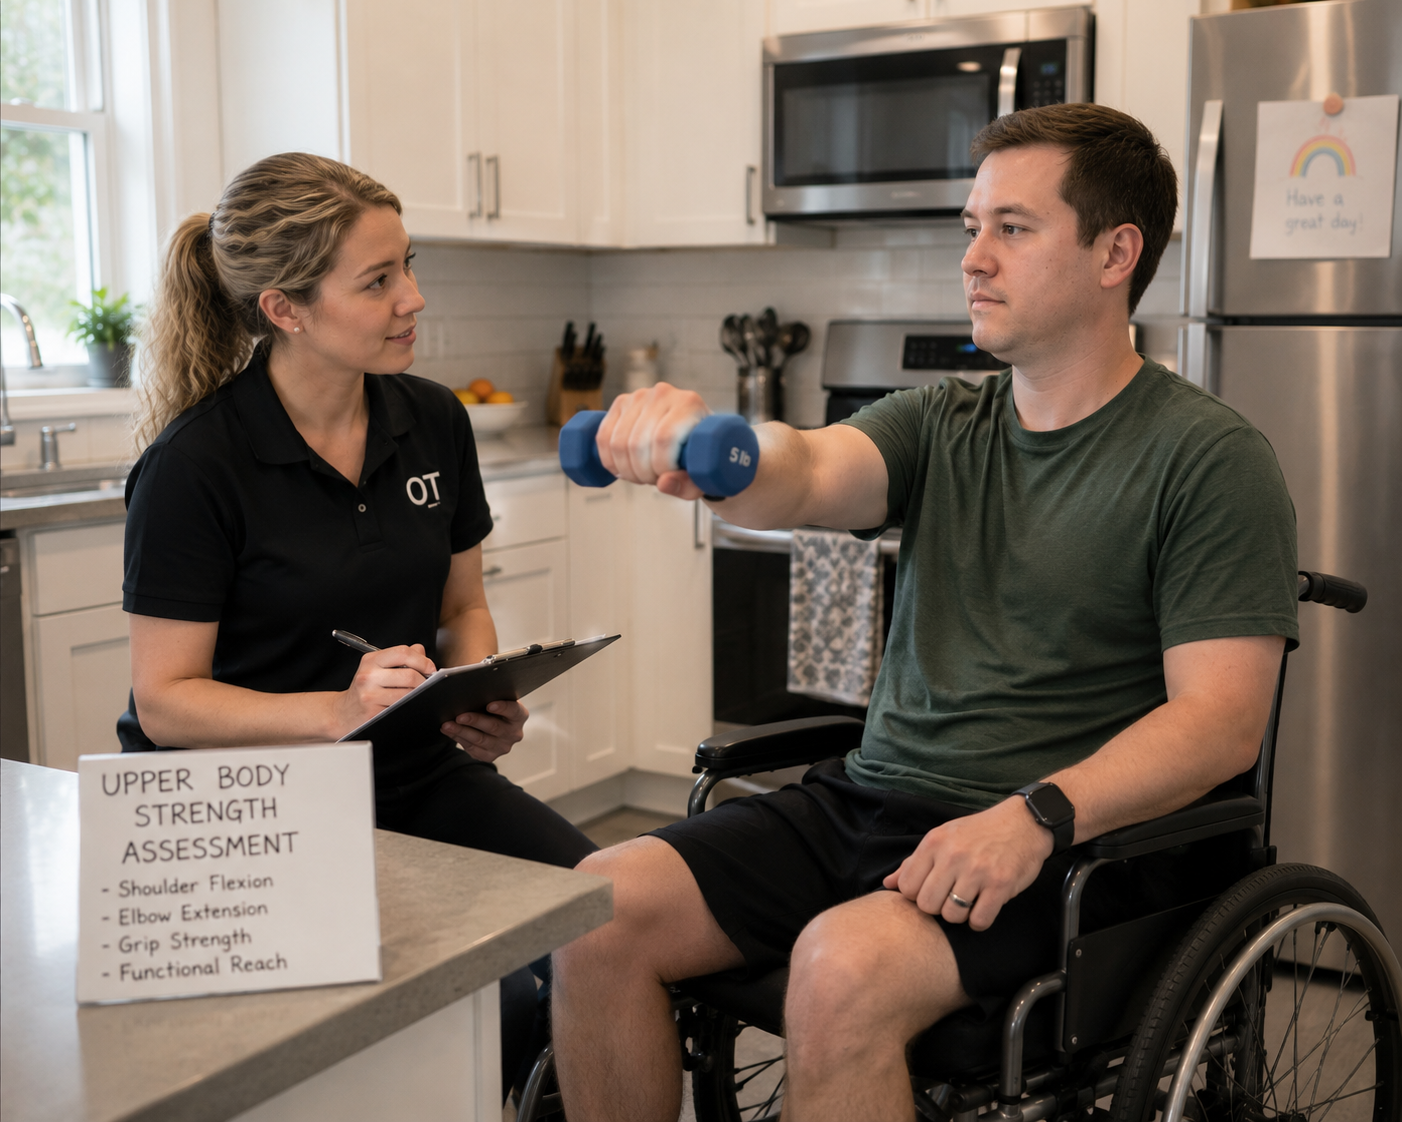
| Assessment Area | Key Question | Design Impact |
|---|---|---|
| Upper Body Strength | Can you lift arms above shoulder height? | Determines upper cabinet accessibility |
| Fine Motor Skills | Can you use small knobs and switches? | Affects faucet and appliance selection |
| Trunk Stability | Can you lean forward safely? | Determines counter depth requirements |
| Cognitive Ability | Can you safely operate appliances? | Affects smart device recommendations |
1.2 Kitchen Measurements
Grab a laser measure and 25-foot tape measure. Measure and record these critical dimensions before buying anything:
Doorway width
________ inches
Doorway height
________ inches
Floor to door handle
________ inches
Current counter height
________ inches
Under-counter clearance (knee space)
________ inches
Turning diameter available
________ inches
Stove type
Gas / Electric / Induction
Sink type
Single bowl / Double bowl — Size: ________
📏 Recommended Tools
Laser measure (highest accuracy), 25-foot tape measure, RoomScan app (creates floor plans automatically)
2. Core Modification Points
2.1 Doorways and Passages
Doorway width is one of the most critical measurements. If a doorway is too narrow, the wheelchair simply cannot pass through.
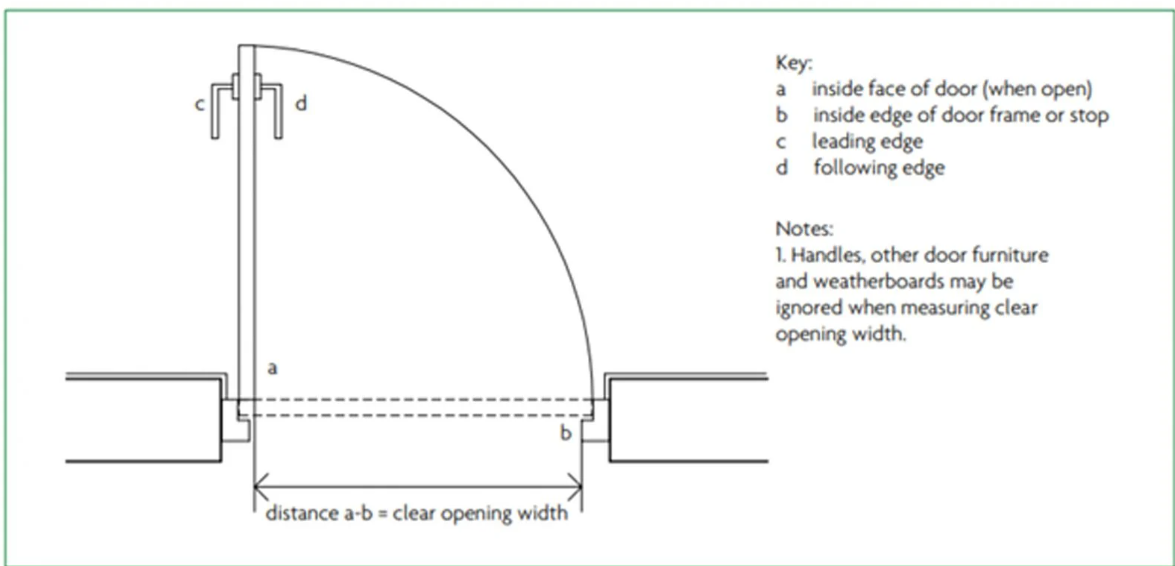
| Passage Type | ADA Minimum | Comfortable Width |
|---|---|---|
| Straight through doorway | 32 inches | 36–40 inches |
| 90-degree turn | 60 inches | 64–72 inches |
| Wheelchair turnaround area | 60-inch diameter | 72-inch diameter |
⚠️ Safety Warning: Doorways narrower than 32 inches may prevent powered wheelchair access and can cause hand injuries.
Three Ways to Widen a Doorway
Option A — Widen the Doorway
Remove the existing door frame and expand to 36–40 inches. Consider installing a sliding or pocket door to save space.
Option B — Remove the Door
Remove the door leaf but keep the frame. Install a removable door later if privacy is needed.
Option C — Change the Swing Direction
Convert to an out-swing door or sliding door. Remove door stops and any obstacles.
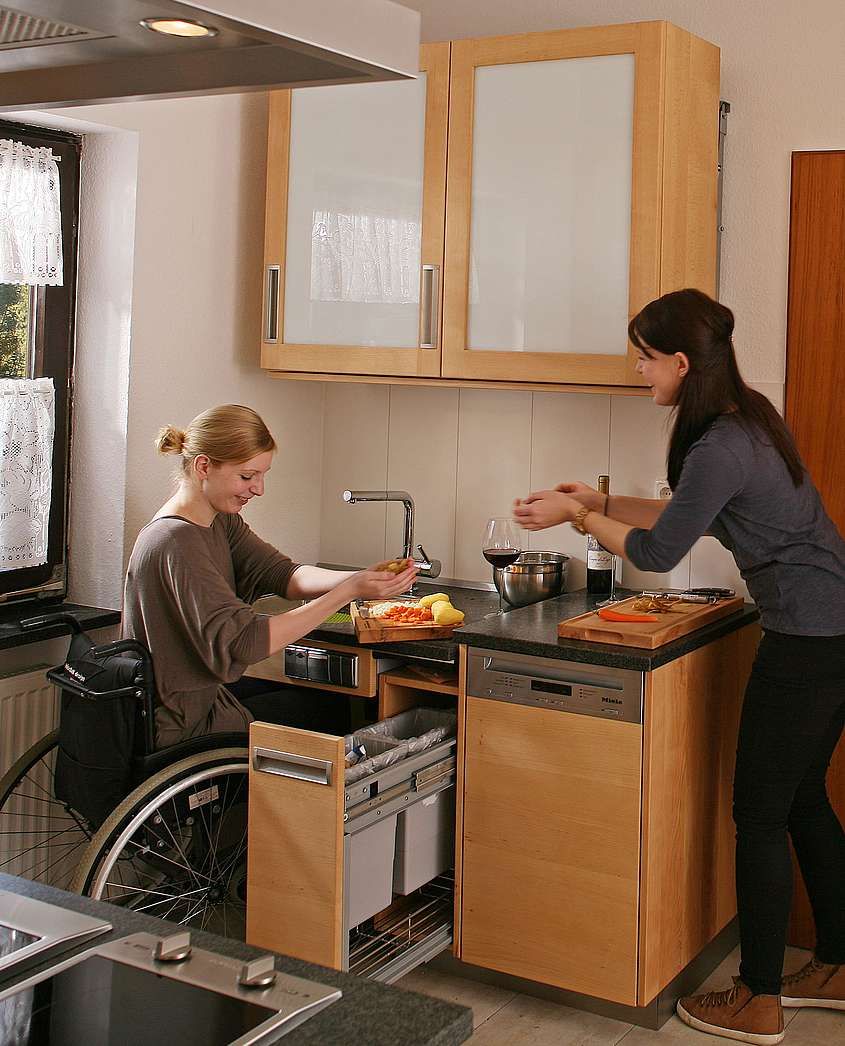
2.2 Counter Height
Counter height is the most important factor in whether someone can work independently in the kitchen. The goal is to bring work surfaces within comfortable reach from a seated position.
💡 The Golden Rule
Comfortable working height = your seated elbow height minus 3–5 inches.
For most adults: counter height of 28–34 inches is ideal.
Powered Wheelchair Considerations
- Footrest height typically adds 2–6 inches below the chair
- Joystick controller may protrude 4–6 inches in front
- Knee clearance must be: at least 30" wide × 27" high × 19" deep (ADA 2010 standard)
Lower Entire Counter
$1,200–2,200
Lower a Section
$400–800
Add Adjustable Solutions
$45–220
2.3 The Sink
The sink is one of the most frequently used areas in the kitchen — and one of the most commonly overlooked in accessibility modifications.
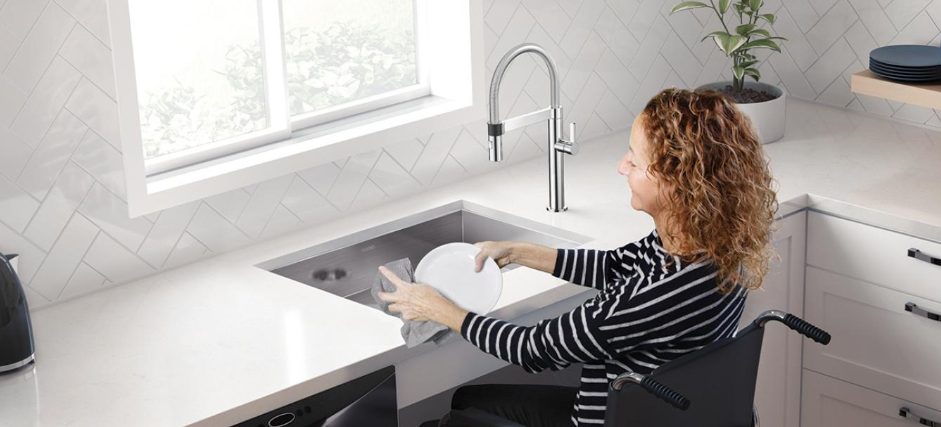
| Feature | Minimum | Ideal |
|---|---|---|
| Sink depth | 6 inches or less | 5–6 inches |
| Faucet height | 10 inches | 10–12 inches |
| Faucet operation force | 5.5 lbs or less | Lever or touchless |
| Drain position | Rear or side wall | Avoids knee collision |
Key Sink Recommendations
🦷 Shallow Single-Bowl Sink
5–6 inches deep. Single bowl allows pots to lay flat. Brands: Kohler Riverby/Strive, Moen, Delta.
🚿 Lever or Touchless Faucet
Single-handle lever (wrist operable) or touchless activation. Pull-down sprayer extends reach.
🌡️ Anti-Scald Protection
Thermostatic mixing valve. Hand-washing: 100–105°F. Users with reduced sensation: lower settings.
🪛 Under-Sink Modifications
Remove cabinet floor for knee space. Insulate pipes. Relocate drain to rear/side wall.
2.4 The Cooktop
⚠️ Critical Safety Warning
Powered wheelchair users face elevated burn risks: feet cannot retract quickly, wheelchair materials may be flammable, and controller overheating is possible. Induction cooktops are strongly recommended over gas.
⚠️ Medical Device Warning
Induction cooktops generate electromagnetic fields that may interfere with pacemakers or implanted cardiac defibrillators. Maintain at least 24 inches (60 cm) of distance. Consult your cardiologist first.
🌀 Option A — Built-in Induction (Recommended)
$220–600
Flat surface allows close wheelchair approach. Surface doesn't get hot. Timer prevents dry burning. Brands: GE Profile, Bosch, Whirlpool.
🔌 Option B — Portable Induction
$50–150
Best for renters or tight budgets. Place on a stable, low table at the right height.
Safety Features Worth Having
Auto shut-off
Cuts power when pan removed
Anti-dry burning
Detects dry pan, auto-shuts off
Child lock
Prevents accidental activation
Smoke detector link
Detects smoke/overheating
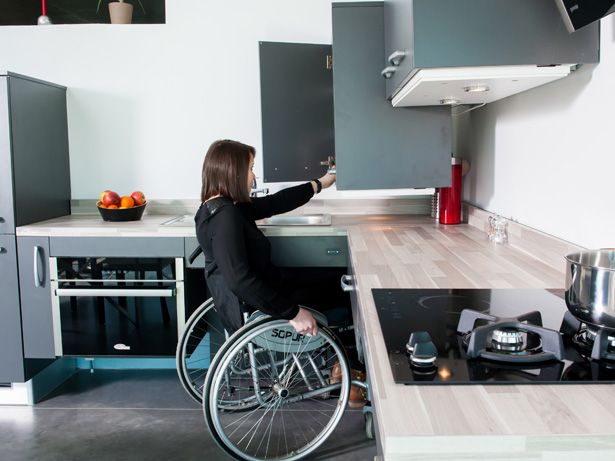
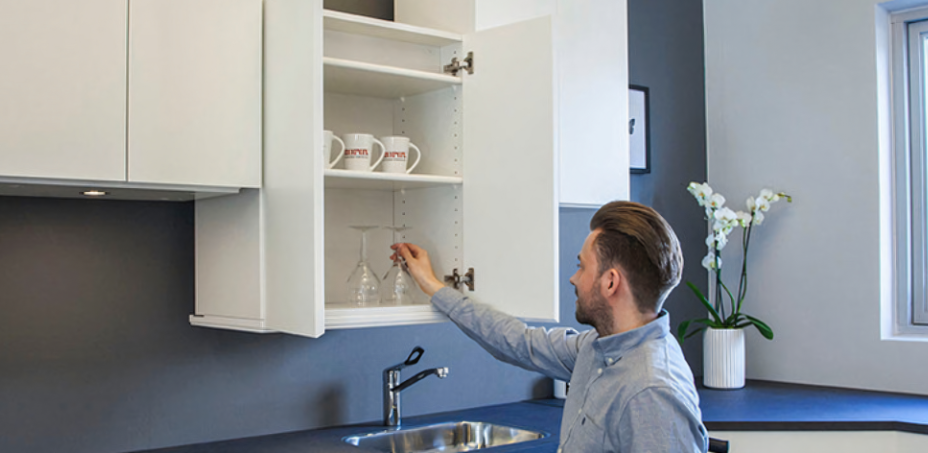
2.5 Storage Systems
Most kitchen storage is designed for standing users. Wall cabinets above 55 inches are completely unreachable from a seated position. Here's how to fix it.
Option A — Drawer Base Cabinets
Convert swing-door base cabinets to full-extension drawers. Organize by height: Low (12–24"): heavy items. Mid (24–36"): daily use — PRIMARY ZONE.
Option B — Pull-Down Wall Cabinets
Keeps existing wall cabinets but adds an internal pull-down shelf. A light pull brings items to counter level.
Option C — Open Wall Storage
Install wall rod + hooks at 32–44 inches from floor. Magnetic knife strip at adjustable height. Open shelving 6–8 inches deep.
3. Choosing Your Renovation Plan
| Easy | Medium | Major | |
|---|---|---|---|
| Budget | $140–445 | $1,200–2,500 | $5,000–15,000+ |
| Timeline | 1–2 hours | 2–5 days | 2–6 weeks |
| What It Covers | Assistive devices | Counter and sink | Full cabinetry overhaul |
| Best For | Renters, short-term | Homeowners, long-term | New builds, deep needs |
| Independence | ⭐⭐ | ⭐⭐⭐⭐ | ⭐⭐⭐⭐⭐ |
Easy Plan
- ✓Electric standing desk / adjustable work surface ($45–120)
- ✓Lever-handle faucet / faucet extender ($15–30)
- ✓Portable induction cooktop ($50–150)
- ✓Wall rod with hook set ($15–40)
- ✓Rolling storage cart ($15–50)
Medium Plan
- ✓Section of counter lowered ($400–750)
- ✓Shallow single-bowl sink + lever faucet ($150–350)
- ✓Full-extension drawer installation ($300–700)
- ✓Built-in induction cooktop ($200–450)
- ✓Under-sink knee space modification ($100–180)
Major Plan
- ✓Complete cabinet removal and custom rebuild ($3,000–8,000)
- ✓Plumbing and electrical relocation ($800–2,000)
- ✓Custom accessible sink system ($800–1,500)
- ✓Motorized lift wall cabinet system ($1,500–3,000)
- ✓Professional non-slip flooring ($1,000–2,500)
6. Real Stories
Sarah's Kitchen
Austin, Texas · 68 years old · Rheumatoid arthritis, powered wheelchair user for 2 years
Budget: $800
Before
- ✗ Original counter at 36" — required raising arms constantly
- ✗ Wall cabinets completely unreachable
- ✗ Sink depth 9" — water splashed on her lap washing dishes
What Was Done
- ✓ Lowered sink-area counter to 31"
- ✓ Shallow 5.5" single-bowl sink + lever faucet
- ✓ Removed cabinet floor under sink for knee clearance
- ✓ Converted base cabinets below cooktop to 3 full-extension drawers
"I can cook my own meals again without waiting for my daughter to visit on weekends. The sink is the best part — I don't get soaked washing dishes anymore."
7. Final Checklist
Once renovation is complete, verify each section:
Doorways and Passages
Counters
Sink
Cooktop
Safety
8. Resources and References
📚 Further Reading
- Universal Design for the Home by Wendy A. Jordan
- Accessible America by Bess Williamson
- AARP HomeFit Guide
- Rehabilitation Engineering and Assistive Technology Society (RESNA)
💡 Before renovating, consult with a certified Aging-in-Place Specialist (CAPS) or an occupational therapist to ensure the plan fits your specific needs. A few hundred dollars spent on professional guidance often saves thousands in buying the wrong equipment.
Document Version: v1.2 · Last Updated: April 2026 · Review Status: Scientific review completed, pending clinical expert review